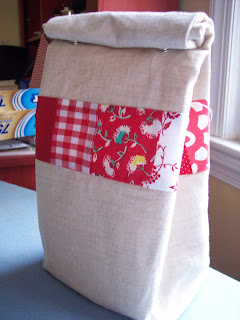
Materials Needed:
- Linen (or fabric of choice for outside)
- Colored Fabric Scraps
- PEVA Shower Curtain (or plastic/vinyl lining of choice)
- Snaps
- Interfacing
-I opted to use a shower curtain from IKEA that is made from PEVA, a food safe plastic. If this is not an option for you, feel free to use whatever you see fit. Since food may come in contact with the lining, I just figured better safe than sorry when it comes to food safety.
- For this tutorial, I am using snaps as a closure. I have also used Velcro, which works well. This is going to be completely based on preference for what to use, but the directions here are for the snaps only.
- Another idea would be to add a handle on the bag for easy carrying. This could easily be done before sewing in the lining, just by adding a length of twill or belting.
-I am using a recycled linen skirt. I often use these as opposed to buying linen by the yard. I like to use linen for this project because I enjoy its likeness to a traditional paper bag.
(1) 6.5”w x 4.5”h rectangle
later you will need more linen for the bag itself, the size will depend on your patchwork strip, but it needs to be at least 20.75” w
3. Pin the strip to a piece of linen that is 20.75”w and at least 6” h. Sew across the width, using a .25” seam allowance. Press toward patchwork piece. Repeat this for the other edge of the patchwork piece.


5. Apply interfacing to the bag piece and the linen rectangle you previously cut. I like to leave a 1” space along the top without interfacing.

9. Turn the linen bag inside out and press if needed. Turn the top 1” to the inside, along the entire piece. Open the fold and turn raw edge to crease, pressing along the way. Fold over again, creating a cuff approximately .5” inside


10. Applying the closure: On the front (one of the “long sides”), go from corner to top and press the side. Do this on all four corners.
- On the back side, place snap .75” from top and 1” on side, for both sides.
- Determine the placement of the snaps on the front side from the ones you just places.
They will most likely be about 1” from the sides and 3.75” from top.
- The best way I find to do this (at least with the snaps) is to attach both snaps on the wrong side, then fold the top of the bag like you’re closing it and press hard on the snaps. This should leave an impression for the snap placement, and then you can proceed to attach the snaps


11. To attach the lining: Insert the lining into the bag, wrong sides together. Slip the top edge of the lining under the cuff you created in step 9. Pin horizontally through the cuff to keep from slipping, making sure not to puncture the lining that shows. Sew around the entire edge, catching the lining in the cuff. It is best to sew close to the bottom edge of the cuff inside.


20 comments:
that is so stinking cute! I love it! definitely bookmarking this! thanks!
Great tutorial. I might even give it a try... my daughter's lunch bag is almost falling apart, and I've been thinking about making her a new one... now I have no excuse not to...
What a fun tutorial! Another item for my list. I also love that you recycled the linen from a skirt. Very cute.
Very cute. One would certainly be the "hit" in the lunchroom.
This is great! Thanks so much for sharing it with us!!!
so great! thanks for sharing.
wonderful! Can't wait to give it a try!!
Thanks so much! I will be making my mother-in-law one for Christmas! Love it.
Thank you. Thank you. Thank you.
I'd run to my sewing machine right now if a) I didn't have to go to work and b) I had the plastic.
Will do this soon!
Thank you, Katie, for making this tutorial. Now I won't have to hear Karyn belly-aching over it any longer! LOL (Except now she'll say she can't find the plastic. lol. She knows I love her, so I can say this without offending her.)
So cute! Thanks!
I love the lunch bag!
Great tutorial. This is going on my Christmas gift idea list... I even have an old linen skirt I could use : )
love it! Thanks for the tutorial!
Wow, thanks for the tute, I had been eyeing your lunch bags!
Such a cute lunchbag!
Another awesome tutorial, Katie!
What a cute idea!! I just found your blog through TwitterMoms :o)
Very neat...
Have a super Sunday!
Dee
Oooh, I'm catching up on my blog reading and I just came across this tutorial. I love it! You+linen+patchwork=beauty! I'm definitely bookmarking this for a later date :)
Amazing tutorial - easy to follow from start to finish. Thank you! I now have a new lunch bag, completely recycled, for my son to start preschool with!
FYI I used a very heavy weight plasic bag instead of the vynel (sp?) and so far it works great.
Post a Comment