

This tutorial is for the Sew, Mama, Sew contest. They've already had some really great entries, so I hope that it is clear and easy for you to use. If it's not, ask questions in the comments and I'll try to answer them there. More pictures can be found on my flickr site and I think they actually look better there too. I have put most of them in a mosaic because otherwise it would have been too many pictures. Please do not use to make items to sell, unless you contact me directly. I gave these to the men in my family for Christmas and they were a big hit. They'd be good for Father's Day too!
A couple of tips before starting:
- Go slowly. Do no pull through machine.
- Use a leather needle, as it is sharper and is made to go through thicker materials
- Use binder clips instead of pins. That way you will not have pin marks through the leather
- Use a small amount of Rubber cement, so that it does not gum up your machine. I use this because it prevents the leather from shifting and dries quickly.
- Increase the tension on your machine when going through more than 2 layers
- Use a longer stitch. I set mine to a 3 or 3.5 for this project
Supply List:
Leather Skirt
Scrap piece of clear vinyl
Rubber Cement
Rotary cutter, mat, and ruler
Tracing pencil
Leather sewing machine needle
Coordinating thread
O.k. Now we’re ready to start:
- Deconstruct the leather skirt by cutting along the seam lines. I find that I like the longer, stiffer skirts for this project. Also, look for a skirt with less seam lines, as you’ll get more mileage out of it.
- Cut the following pieces out of the skirt: (2) 9”w x 3.5” for exterior & inside base of wallet (1) 9” x 3.25” for paper money holder (1) 4" x 3.25” for back of credit card slots (3) 4” x 2” for credit card slots (1) 5” x 5” (this one does not have to be exact)
- Take one 4” x 2” piece and apply a small amount of cement to one long edge. This will be the bottom part. Place the top edge (non-glued edge) of this piece 3/8” down from the top of the 4” x 3.25” piece, right sides up. Press down and allow to dr y for a few minutes. (you may skip to the next step while this is drying, just come back to finish this). Stitch along the bottom, using about 1/8” seam allowance.

Repeat for the next 2” piece, placing the top 3/8” from the top of the last stitched piece.
Repeat same process for the last 2” piece, except start stitching along bottom right, turning the cornering and stitching up the left side of the entire credit card piece.
* If leather is distorted at all during stitching, trim entire piece to 4” x 3.25”.
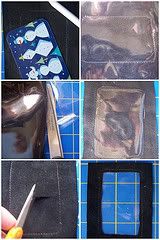
- On the wrong side of the 5” x 5” piece, trace a cc or your license, using a white pencil (or another marking pen), that you can clearly see. Place the scrap vinyl overtop of your tracing mark. Take to the sewing machine, and stitch along your marking line, backstitching at the beginning and end. Trim excess vinyl, close to the stitching mark. Flip the piece over and lightly pull the vinyl away from the leather inside the stitching. Using sharp scissors, remove the inside rectangle, leaving about 1/8” from the stitching. Trim this piece to be 4”w x 3.25”h, centering the vinyl rectangle. Meaning, you will have .5” on top and bottom, and 3/8” on each side, from the stitching line.
- Take the vinyl/leather piece and apply cement to wrong side of the top, bottom & right side. On the credit card piece, apply to top, bottom, and left side. ** Remember this is on the wrong sides, so that when you flip the pieces over, the cement will be on the outer edges of the wallet.
- Take the 9 x 3.25” piece, and place the vinyl/leather piece on the left side, matching sides and corners. Place the credit card piece on the right side, matching sides and corners. Press down, apply binder clips, and allow to dry for a few minutes. Stitch along top, securing both pieces.

- Apply a small amount of rubber cement to the side and bottom edges on the wrong side of the completed 9” x 3.25” piece. Stack this piece on the right side of one 9” x 3.5” piece, aligning side and bottom. In other words, both will be right sides up, and you will be forming the money pocket. Secure with binding clips and allow to dry for a few minutes. Starting on one side (I like to start on the left), stitch, turn corner, stitch bottom, turn again, and then stitch remaining side. It may be tricky to sew through all the layers on the credit card side. If it is, go slowly, increase tension and stitch length. Or, walk away, have a (few) glas
- Flip piece over, and rather quickly, apply cement thinly and evenly over the entire back, except for ~1/4” around the edges. Apply the remaining 9” x 3.5” piece, wrong sides together, pressing and smoothing together. Secure with binding clips and allow to dry for 15 minutes. After it dries, stitch around entire piece, making sure not to catch the inside pocket.


Alternatively, if you would rather have a fabric on the outside of the wallet, you can use this tutorial until the last step. For the outside, cut your fabric 9.5” x 4”, and then press the ¼” seam allowance in on each edge. Cut a piece of fusible webbing a bit smaller than the piece, and fuse the fabric to the back side of the leather piece. Then stitch around the entire piece.
Pheww... how was that?


11 comments:
Katie, this is such a cool tutorial! I have a ruined leather jacket and a suede one that I think can be repurposed for this.
Wow - you really pulled out all the stops - great job! i'm working on mine right now - and taking a break to read blogs. Back to work now...
Wow! You make me wish I would have kept that old skirt of mine.
Katie, this is awesome! Good luck on your competition. I just "discovered" it on StumbleUpon, hope that helps! I have piles of leather and suede and am always looking for new ideas for it. Thanks!
This is great! I'm going to give it a go as I've never actually made a wallet and always wanted to.
Good luck in the comp x
Great tutorial!
I have been needing to make my husband another wallet. The last one was cut down from a purse! I will try this one next.
wow thank you for the detailed tutorial! i've been looking for a great birthday gift idea for my boyfriend....and now i've found it! i know he'll love a new and handmade wallet.
Hi there, this tutorial looks great, but your pictures don't work anymore! I've been looking everywhere for a good tutorial on how to make a bifold wallet with an id pocket, and this is the only one I've found! When/if you get your pictures working again, will you please let me know? My email is siamesedream64@yahoo.com.
Thanks so much!
Hi there, I just finished making my wallet using this tutorial and thought you might like to see the end product! I actually made mine out of an old tie I picked up at a second-hand store; I made this for a Christmas present for my boyfriend and thought the colors on the silk tie would make a nice wallet. Using fabric instead of leather ended up being a lot harder than I thought it would to be! O.o Thank you so much for the tutorial, though. I couldn't have done it without you!
Oopse, forgot the link!
http://fav.me/d2gvgto
Post a Comment