

Lately it seems that I have a lot to show, but no motivation to actually getting around to post. And it's not for lack of computer time either. I'm spending a lot more time on the computer now that the t.v. in our room died (sigh). I really think it's the shorter days. I just need that daylight! (ok, that will be my last daylight savings time rant). The other night I got the sudden urge to embroider, and I've been in an embroidery mood ever since. I don't normally do it, but it's nice to have a craft to do while sitting and watching all my shows.
 From the moment I saw this AB print, I was in love. I just love the color and style. So, I drew one of the lotus flowers and embroidered it in red on some scrap linen. Sewed a few quick strips around the edges, and backed it with linen.
 I stuffed it with a pillow form that I picked up at IKEA for $1.49. How cheap is that?? I have two more forms, so I'll probably be making a few more pillows. I'm really happy with how this came out. I just love the embroidery. I'm planning on doing some more embroidery for an ornament swap I'm participating. John starts his 4th round of chemo tomorrow, so it'll be a good little project to take with me. You gotta love portable crafting!
I also wanted to offer up a little deal to my blog pals. I have a lot of headbands leftover from the craft fair, and they're just taking up space. For some reason I really thought I'd sell like 100 of them, so I made close to that. Oh boy, that was silly. So, if you're interested, please send me an e-mail at katiebhandbags@gmail.com and I'll set up an etsy listing just for you. Regular price is $8.50, sale price is $7.50 each, or 2 for $14, or 3 for $20. Buyer must pay for shipping. You can see your choices here. It also comes in green, I just haven't relisted it yet.


 I've been wanting to make travel bag, or a "
 Anyway, this one is up for sale on
 He loooooooved having mousse in his hair. It was so crazy. I actually had to hide the bottle because he kept walking around with it trying to put it in his hair. Ugh, I hope I didn't start something there. He was a little apprehensive about the whole trick or treating thing, but once he realized he was getting something out of it, there was nothing stopping him. He got some good things too (and I should know, I ate most of it). He wouldn't say "trick or treat", so we had him knock and say "pleeeeeeeaaaaaaaasee." It was so cute.
  Anyway, just thought I'd share since I have nothing better, or crafty to blog about. I'll be making two pies tonight, and will be preparing for some heavy cooking tomorrow. I hope you all have a wonderful and safe Thanksgiving!
 I know I said that I was sick of sewing scarves, but Saturday found me sewing up a scarf for my
 It's from the same fabric as
 The outer fabric I got at Hancock's last week when the decorator fabrics were 50% off. I am in looove with it and I'm tempted to go buy more. Since it's so dreary out the pictures aren't the best, but I did need an opinion on the button. What do you think? With or without?
 This may find itself in my

 After the glue dries, paint on the hair. You can use your color choice


 Add a small strand of beads across the front.


 I used cake stands to prop up the smaller bags, and a few bowls to hold other items on the table.


 During this project, sewing became therapeutic again and a lot less stressful. Funny how that happened. All the linen for these bags came from one skirt I found at the thrift store. Can you believe that? I think I paid less than $2 for it! Much better than the $7.99 a yard linen from Joann's. I am having a little trouble with the pricing of some of my items though. How much should I price these bags for? They're about 10" wide, 5" high, and 5 " deep.


 Arrange scraps in pleasing order and sew together. You can either sew them with straight edges, or cut the scraps at small angles. When finished, you'll should have a piece that is at least 7" long, but not longer than 9", and at least 2" wide.
 Cut one edge of the piece and use that side as a guideline for you next cuts. Cut into 2" wide strips. Depending on how wide your piece is, you will end up with several different bookmarks.
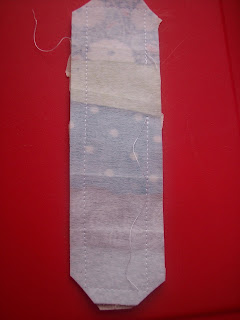
 Trim corners, turn out bookmark, and press.


 Posts
Posts


